Hello everyone! Welcome to pentestguy. In this post we are going to discuss about android pentesting lab setup with android studio. After noticing many users encountering issues with setting up a lab using Genymotion, as observed in the comments on my Genymotion setup video for Android penetration testing, So here is the alternate way of lab setup for android pentesting with android studio.
Download Android Studio
Begin by visiting the official Android Studio download page and select the version compatible with your operating system.
Extract the downloaded files and navigate to the /bin directory. For Linux users, find the studio.sh script.
./studio.sh
Install android studio

Launch the script, opt for the default/standard options, and agree to the terms. The installation process will commence, so please be patient.
Add New Device
Open the Virtual Device Manager within Android Studio.

Click on “Create Device” to choose the hardware that suits your system specifications.

Select the operating system, and if it’s a new one, it will download before you can proceed.

Provide a name for your device and complete the setup.

You can now see it in the device manager.

Start the device and attempt to access the Android Debug Bridge (ADB) shell using the provided commands:
adb devices
adb shell
ls

Setting up a Burp Proxy for Android:
Let’s configure a Burp Proxy on our Android device
Open Burp Suite and navigate to the Proxy section. You can either use the default port 8080 or add a new port along with 127.0.0.1.

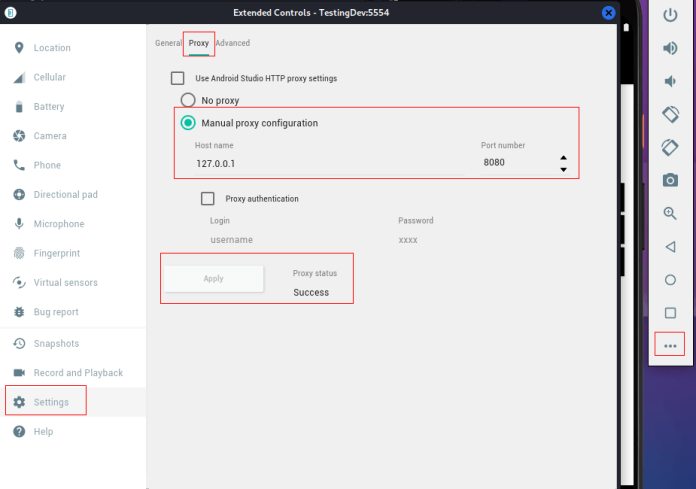
In your device settings, go to the proxy section and add the proxy with the specified port number.

Download the Burp certificate to your local device, rename the extension from “cacert.der” to “cacert.crt,” and drag it onto your Android device.
To install the certificate by going to Settings > Security > Encryption & credentials > Install from SD card. Locate the certificate and install it.

Your lab is now successfully set up and ready for use.
If you found this post helpful then please share it with your co-workers and friends. Please provide your valuable comment and let us know if there is any suggestion. Now you can also collab with us please check our collaboration page, thank you!
